Introduction
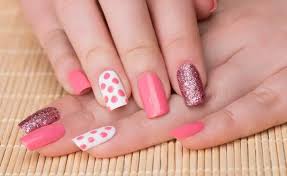
Nail art has become a popular trend in recent years, allowing individuals to express their creativity and style through intricate designs on their nails. Whether you’re a beginner or a seasoned nail enthusiast, this article will guide you through some DIY techniques to create stunning nail designs. From basic nail art ideas to more advanced techniques, let’s dive into the world of nail art and unleash your inner artist.
Prepping Your Nails
Before diving into the world of nail art, it’s essential to start with a clean canvas. Here’s how you can prep your nails for the best results:
Trim and Shape
Start by trimming your nails to your desired length and shape. File them gently to smooth out any rough edges and create a clean base.
Cuticle Care
Push back your cuticles using a cuticle pusher or an orangewood stick. Be gentle to avoid damaging the delicate skin around your nails.
Buffing
Gently buff the surface of your nails to remove any ridges or unevenness. This will create a smooth canvas for your nail art.
Cleanse
Finally, cleanse your nails with nail polish remover to remove any oils or residue, ensuring better adhesion for the nail polish and designs.
Top Nail Designs Trends for 2024
2024 is shaping up to be an exciting year for nail trends, with a mix of fresh takes on classic styles and some new ideas emerging. Here are some of the hottest nail designs you can expect to see this year:
Basic Nail Art Techniques
If you’re new to nail art, starting with basic techniques is a great way to develop your skills. Here are a few simple but stunning ideas to get you started:
Dotting Tool
A dotting tool is an excellent tool for creating various designs. Dip the tool into different nail polish colors and create dots on your nails. Experiment with different sizes and patterns to create unique designs.
Stripes
Use striping tape or thin brush strokes to create striped patterns on your nails. Apply the tape or brush the polish diagonally, vertically, or horizontally to achieve different effects.
Stamping
Nail stamping is an easy technique that allows you to transfer intricate designs onto your nails. Use a stamping plate with the desired pattern, apply nail polish to the design, scrape off the excess, and press the stamper onto your nail to transfer the image.
Gradient
Create a beautiful gradient effect on your nails by blending two or more colors together. Use a makeup sponge and apply different shades of nail polish to the sponge. Dab the sponge onto your nails to achieve a seamless gradient.
Advanced Nail Art Techniques
Once you’ve mastered the basics, you can move on to more advanced nail art techniques that will truly elevate your designs. Here are a few ideas to challenge yourself:
Freehand Nail Art
Let your creativity run wild by painting intricate designs directly onto your nails. Use thin nail art brushes and acrylic paints or highly pigmented nail polishes to create detailed patterns, flowers, or even mini works of art.
Water Marble
The water marble technique creates mesmerizing swirled patterns on your nails. Fill a small bowl with room temperature water and drop different colors of nail polish into the water. Use a toothpick or a thin needle to create designs by swirling the colors together. Then, dip your nails into the water to transfer the pattern onto your nails.
Nail Art
Take your nail art to the next level by incorporating 3D elements. Use nail art molds or create your own embellishments with acrylic powder or gel. Attach the 3D designs to your nails using nail glue for a stunning, multidimensional effect.
Negative Space
Embrace the negative space trend by leaving areas of your nails bare while incorporating designs around them. Use tape or nail art brushes to create geometric shapes or patterns, allowing the natural color of your nails to become part of the design.
Finishing Touches and Maintenance
To ensure your nail art designs last longer and look flawless, consider the following finishing touches and maintenance tips:
Top Coat
Apply a high-quality top coat over your nail art to seal the design and provide extra protection. This will prevent chipping and help your nail art last longer.
Cuticle Oil
Keep your cuticles and nails healthy by regularly applying cuticle oil. This will nourish and moisturize the skin, promoting healthy nail growth and preventing dryness.
Maintenance
Be mindful of your daily activities to avoid damaging your nail art. Use gloves when doing household chores, avoid using your nails as tools, and apply an extra layer of top coat every few days to maintain the longevity of your designs.
Removal
When it’s time to remove your nail art, soak a cotton pad in nail polish remover, place it on your nail, and wrap it with aluminum foil. Let it sit for a few minutes to loosen the polish, then gently remove the foil and wipe off any remaining residue.
Conclusion
In conclusion, nail art is a fun and creative way to express yourself and enhance your personal style. With these DIY techniques, you can create stunning nail designs from the comfort of your own home. Whether you’re a beginner or an experienced nail artist, experimenting with different techniques and designs will allow you to unleash your creativity and achieve beautiful, eye-catching nails. So, grab your tools, choose your favorite colors, and let your imagination soar as you embark on your nail art journey.